vampire nail art: the elegance of bloodsuckers

sink your teeth into a mesmerizing blend of romance and elegance with this alluring vampire nail art.
step 1. prepare your canvas: start with a base coat, like ‘strong start base coat’, to ensure a long-lasting and chip-free halloween manicure.
step 2. create the french manicure: dip a fine detail brush into 'blanc' and carefully paint a smile line across the tip of each nail. clean up any mistakes using an angled eyeliner brush dipped in acetone.
step 3. queue the blood drips: using 'not red-y for bed,' draw the outline for "blood" droplets by painting small semi circles of varying sizes in different areas of the nail. then, polish a vertical line from each semi circle to the tip of each nail.
step 4. add the finishing touches: round out the lines and droplets using the same color and brush to complete the dripping effect. clean up any smudges with the angled eyeliner brush and acetone. finish with a glossy topcoat, like ‘gel setter top coat’, for a truly vampiric shine.
monster nail art: a stitch in time

this halloween, unleash your inner mad scientist and electrify your nails with a monster-inspired manicure.
step 1. prep your nails: begin with a base coat, like ‘strong start base coat’, to provide a solid foundation for your monster-inspired manicure.
step 2. create the green base: using 'un-guilty pleasures,' polish an angled line in one of the four corners of each nail. then, fill in the area to the side with the same color.
step 3. add complementary lines: with 'willow in the wind' and the same detail brush, paint complementary lines in another corner of each nail and fill them in.
step 4. stitching details: using 'licorice' and a fine detail brush, trace over the lines created in steps 2 and 3 with a thin line. add small dashes and X's to the line to mimic stitches. finish with a glossy topcoat, like ‘gel setter top coat’, to seal in your monstrous masterpiece.
werewolf nail art: howl at the moon
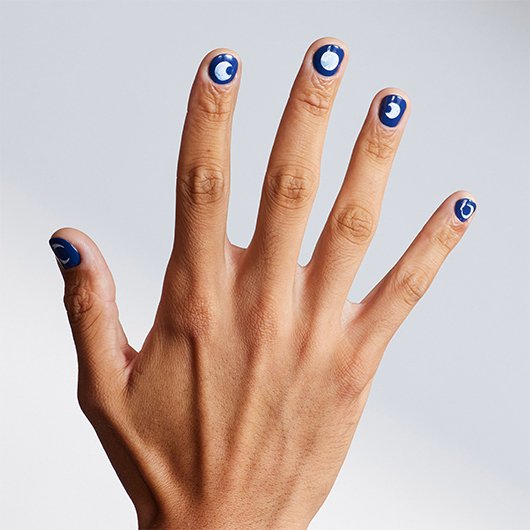
embrace the eerie beauty of a werewolf's moonlit night and leave everyone moonstruck with this celestial werewolf nail art.
step 1. apply a base coat: begin with a clear base coat, like ‘strong start base coat’, to provide a smooth surface for your halloween nail art. once the base coat is dry, apply two coats of 'left on shred' to each nail. this deep blue will serve as your nighttime sky.
step 2. create a full moon: using ‘blanc' and a fine detail brush, paint a small cross in the middle of the middle nail. connect the ends of the cross with curved lines to form a perfect circle and fill it in to create a full moon.
pro tip: to add depth, blend ‘blanc' and ‘left on shred' on a piece of tinfoil and use these shades to create depth on the moon.
step 3. complete the lunar cycle: repeat step 2 on the rest of the nails, making the circle smaller as you move outward from the middle finger to simulate a lunar cycle. create the crescent moon shape by dipping the detail brush back into 'left on shred' and painting a small semi circle to the side of the moon.
step 4. finishing touch: seal your celestial creation with a glossy topcoat, like ‘gel setter top coat’, for a mesmerizing look.
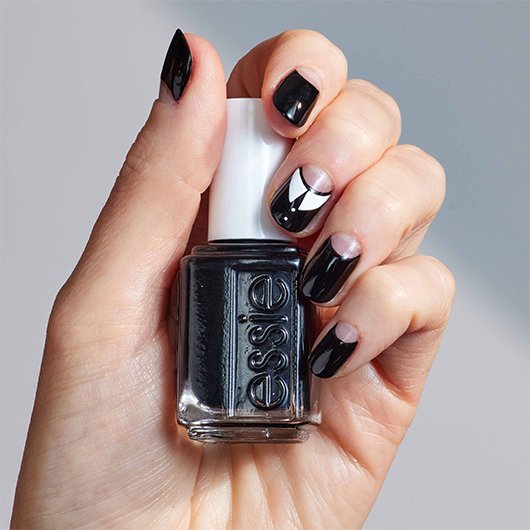
werewolf nail art: unleash the beast
transform your nails into menacing claws and leave a fierce impression in this werewolf –inspired nail art.
step 1. apply a base color: apply a clear base coat, like ‘strong start base coat’, to protect your nails and enhance the longevity of your manicure. then, polish two coats of ‘lady like’ to each nail and let it dry.
step 2. create werewolf claws: get the claws out! using ‘licorice' and a fine detail brush, paint two angled lines to form a V shape from the cuticle, meeting in the middle of the tip of the nail.
step 3. define the claws: fill in the V shape to form werewolf talons. these menacing claws add a fierce touch to your halloween look.
step 4. final touch: finish your fearsome nails with a glossy topcoat, like ‘gel setter top coat’, for a deadly shine.
mummy nail art: unwrap the mystery
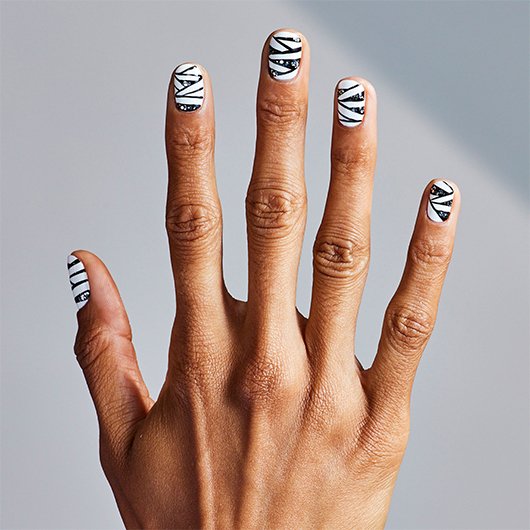
unearth the mystical charm of ancient egypt and have everyone wrapped up in awe in this mummy-inspired nail art.
step 1. start with a base coat: apply a clear base coat, like ‘strong start base coat’, to provide a smooth canvas and protect your nails. polish two coats of ‘blanc’ to each nail and let it dry.
step 2. create the mummy wraps: now, let's mummify those nails! using a fine detail brush dipped in ‘licorice,' start by polishing horizontal and diagonal lines across each nail. be creative with your wrap patterns, making them appear crisscrossed and irregular for an authentic mummy effect.
step 3. add depth to the wraps: to make your mummy nails even more captivating, use the same fine detail brush and ‘licorice' to fill in some of the small triangle shapes on the sides of each nail. these filled-in triangles will create shadows and give the appearance of overlapping wraps.
step 4. add some sparkle: lightly dab ‘set in stones' glitter into the ‘licorice' triangles using the same detail brush. this adds a touch of shimmer to your mummy-inspired nails.
step 5. finish with a glossy touch: seal the mummy magic with a glossy topcoat, like ‘gel setter top coat’ for nails that shine like a crypt treasure.
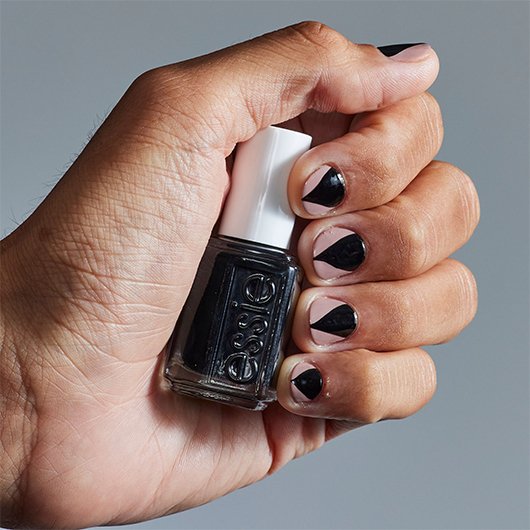
goth girl nail art: spooky glam
transform your nails into a work of darkingly chic artistry in this goth girl -inspired nail art.
step 1. begin with a base coat: apply a clear base coat, like ‘strong start base coat’, to protect your nails and keep your manicure looking flawless.
step 2. make moon-shaped ascents: use 'licorice' and a fine detail brush to paint a small smile line, tracing the moon of each nail. fill in the rest of the nail from the line to the tip with 'licorice,' creating an empty moon manicure.
pro tip: any mistakes can be cleaned up with a rounded concealer brush dipped in acetone.
step 3. add collar and buttons: on the middle finger, use 'blanc' and the fine detail brush to paint two triangle shapes, creating a sharp collar. add two dots with the same color and a small dotting tool down the middle of the nail to mimic buttons.
step 4. finish with a glossy touch: seal the eerie elegance with a glossy top coat, like ‘gel setter top coat’, for a goth girl inspired look that's both chilling and chic.
stitchy nail art: eerie elegance
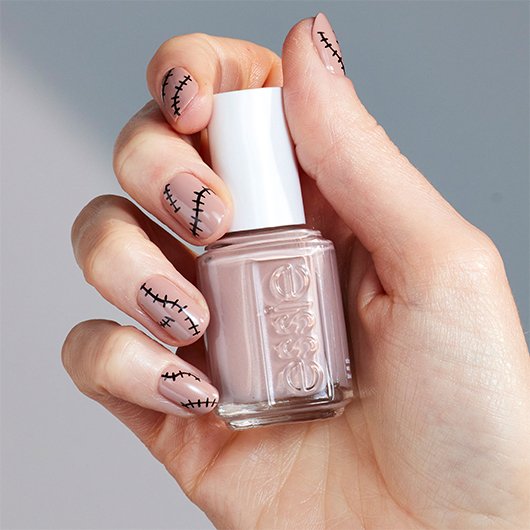
glamify your nails in a way that's both eerie and enchanting with this stitchy nail art look.
step 1. start with a base coat: apply a clear base coat, like ‘strong start base coat’, to protect your nails and provide a smooth surface for your manicure.
step 2. muted elegance: apply two coats of 'lady like' to all your nails,creating a soft and neutral background for your thing-inspired design.
step 3. fingers at play: with 'licorice' and a fine detail brush, paint thin, curved or wavy lines on each nail. these lines will mimic the appearance of stitches.
step 4. stitch it up: using the same color and brush, add short dashes to each curved or wavy line to replicate stitches. finish with a glossy top coat, like ‘gel setter top coat’, for nails that capture the eerie elegance of this stitch design.